Electric Trike Company Trike Kits-

Details
At last an Electric Bicycle motor kit that is affordable and dependable. The new Electric Trike Power Kits come with instructions for EASY assembly. The Electric Trike Power Kit is made right here in the U.S.A.
The new Electric Trike Power Kit will provide speed of up to 15 MPH for two wheel bikes, up to 10 MPH for the tricycle.
Perfect Combination for Travel, Exercise and Fun
Electric Bike Ideal for Short Trips Around Town
Pedal Assisted, No License Required
Use at Parks, Campgrounds, Boats and Campus
Speeds up to 15 M.P.H.
Range up to 20 miles
Environmentally Safe
To fully utilize the Electric Trike Power kit for exercise, try to use the motor mainly to assist your pedaling up hills inclines, or when you find yourself a little tired and would like the extra help. When pedaling without using the motor you are generating a charge back in the battery.
Tools Required
Standard slip joint pliers
A small adjustable crescent wrench
Scissors or Wire Cutter to trim plastic tie straps
Battery Charging & Safety Procedures
Charge your battery for a minimum of 24 hours the first time. After that, your battery should be recharged overnight. We recommend that when you are not using the bike you leave it on charge. The charger is a smart charger and will shut off when the battery is charged and go on again when the battery charge gets low. Note: our battery is 12-volt. Please make sure charger is set on 12-volt.
Universal Front Wheel Motor Kit Installation
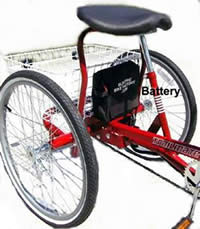
Our universal front wheel motor kit fits most all types of bikes. On the trike the battery mounts either in front of the rear basket or insider the basket.
Note: The electronic board connection to the battery is the last wiring connection you should make.
For Safety’s Sake Always Wear a Helmet When Riding
Do not connect battery wires from the electronic board to the battery yet. The battery connection is the last wiring connection you should make. If for any reason you have to go into the battery bag to check anything make sure you disconnect the black ground battery connections first. When all connections are made to the electronic board, then you can put the black battery wire in place.
The battery can be mounted in or in front of rear basket. Battery is secured to rear basket by pulling straps through openings in basket and clasping buckle and tightening strap.
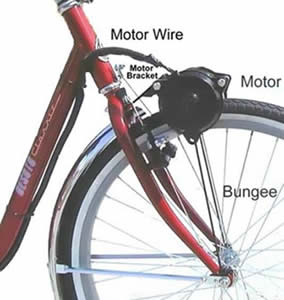
Important: Motor must be mounted on right side of bike. Locate the hole at top of the fork of the bicycle or the tricycle. Simply mount bracket over the hole, align the drive wheel of the motor to be parallel with the tire so that it makes contact with the tire but is not pushing down hard against it. Depending on the bike, some slight bending up or down on the bracket may be needed to achieve proper contact. Tighten the single screw from the rear of the fork through the hole to the bracket securely. Attach bungee cord to the fork with tie straps. Don’t pull bungee too tight. It only needs about 2 lb of pressure so the drive wheel does not slip. Bikes or trikes that have front fenders, the fender must be removed or cut just in front of where the bracket is mounted. Installation is complete.
In bikes with hand brakes, the front brake assembly uses this hole. Remove the bolt holding the brake assembly & slide the assembly forward. Place the mounting bracket in front of the fork, but behind the brake assembly. Making sure the drive wheel & tire are properly aligned (as described above). Insert & tighten the bracket & brake assembly using the new longer bolt supplied with the motor unit Installation is complete.
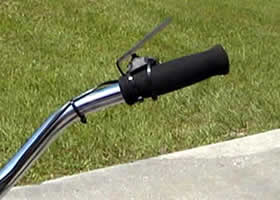
Location will be determined on type of bike or trike installation being done. Trikes & ALL bikes with hand brakes must install the trigger on the left handlebar to avoid interference with using the front brake as the front hand brake is always first used. Interference in proper application of the brake could result in serious injury or safety hazard. Location of the trigger on Cruiser types can be on either side.
Find the place on the proper side of the handlebar that feels comfortable to reach & allows good hand placement around the handle grips, while not interfering with hand brake operation. Attach the trigger using plastic tie wires. Closely trim plastic tie wires removing any sharp edges after cutting.
Use additional plastic tie wires to hold the wiring close to the handlebar & frame of the bike or trike but loosely enough not to interfere with free movement of handlebar when turning the bike or trike. Start the attachment from behind the trigger & back to the battery pack. Should you find any extra lengths from the trigger wire simply coil it up & secure it with a plastic tie wire. It will safely tuck away inside the battery bag.
NOTE: The electronic to the battery connection is the last wiring connection you should make.
Remember you must pedal first and then hit the switch
Universal Trike / Bike Kit:
The kits come with motor, 12 Volt 18 amp sealed lead acid battery, electronics, battery bag, fully automatic charger, & all hardware.
Deluxe Heavy Duty Kit:
This kit comes with motor, 12 Volt 33 amp sealed lead acid battery, electronics, battery bag, heavy duty fully automatic charger, and all hardware.
Motor:
High efficiency, ceramic, and permanent magnet direct current motor. High output.
Switch:
Solid state electro-mechanical system. Spring loaded safety on/off trigger switch shuts off motor when released. Safety Feature: Rider must pedal to engage the motor.
Electronic Board:
State of the art electronics "the brain" . All connections plug into the electronic board. It has a built in surge suppresser that monitors & protects the system from over heating. This is an Electric Trike Company Exclusive.
Battery:
Sealed lead acid battery 12 volt available in 18 amp or heavy duty 33 amp.
Speed:
Pedal assisted speed up to 15 mph for bikes & 10 mph for trikes (250 pound rider). If you pedal more, you can go farther. No Drivers License is required in the United States.
Distance & Range:
Total distance & range is dependent on terrain and rider input through pedaling, & rider weight. The 18-amp battery is good for a distance of approximately 15 miles on the bike & on the trike with 18 amp battery the distance is approximately 10-12 miles. On trike with 33-amp battery is good for approximately 20 miles.
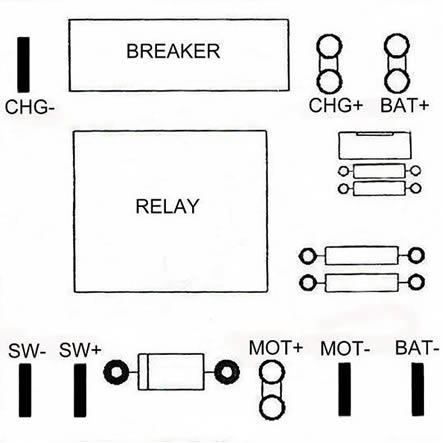
1. Switch Connect the end of the switch wire to the board where it says SW- and SW+. There is no positive or negative so it makes no difference which ends you connect to the board. This completes the switch circuit.
2. Motor Connect black wire into MOT- on the board and the red wire into MOT+ on the board. This completes the motor circuit.
3. Charger wires must be connected to the battery terminals. Do not use the charger connections on the electronic board. The red and black trailer plug-in connector remains outside the bag for quick recharge.
4. Battery wires are pre-connected to the board. Just connect “O” ring to battery terminals, red (+) positive & black (-) negative wire to matching battery post. This completes battery connection. If you have to go into the battery bag. The first thing you must do is disconnect the black battery wire before you do anything. This makes the board inactive. Then you will be able to do what you have to without shorting out the board, reconnect black wire when done.
5. Use very little tension on the motor bungee cords. It needs only 2 lb. pressure so the wheel will not slip.
6. PLEASE NOTE: The bicycle must be pedaled before the switch will start the motor. This is a safety feature.